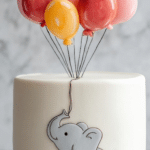
Gelatin Bubbles Recipe
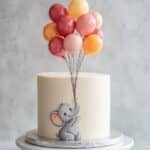
Gelatin bubbles are delicate, colorful edible spheres made by coating small balloons with a thin layer of flavored gelatin. These translucent bubbles can be used as a whimsical garnish or a fun addition to desserts and drinks. The process involves hydrating gelatin, adding food coloring, coating the balloons twice, and allowing them to harden overnight for a beautiful, lightweight decoration.
- Prep Time: 15 minutes
- Cook Time: 25 minutes (includes gelatin heating and dipping process)
- Total Time: 4 hours 40 minutes (includes drying time overnight)
- Yield: 30 gelatin bubbles 1x
- Category: Dessert Garnish
- Method: No-Cook
- Cuisine: Western
Ingredients
Scale
Gelatin Mixture
- 6 Tbsp (56g) unflavored gelatin
- 3/4 cup (180g) cold water
- Gel food coloring (a few drops, as desired)
- Luster dust (optional, for shimmer)
Coating and Tools
- 3 Tbsp shortening
- 30 small balloons
- Paper towels (for wiping shortening)
- Paper straws (optional, for handling balloons)
Instructions
- Prepare Balloons: Partially inflate each of the 30 small balloons, tying a knot high on the neck to create a spherical shape. Optionally, tie balloons to paper straws for easier handling.
- Apply Shortening: Using paper towels, coat each balloon evenly with a thin, shiny layer of shortening, ensuring no white streaks remain. This greasing helps with easy removal later.
- Hydrate Gelatin: In a small heat-proof bowl, pour 3/4 cup cold water, add 6 Tbsp unflavored gelatin, and gently swirl to dissolve. Let it sit for a few minutes to bloom (absorb water).
- Heat Gelatin: Microwave the bowl for approximately 20 seconds until the gelatin is warm and fluid but not hot. Stir well to dissolve completely.
- Add Color and Luster: Mix in gel food coloring and optional luster dust thoroughly. If undissolved, microwave additional 10-second intervals and stir. Remove any foam or bubbles on top with a spoon for clear bubbles.
- First Dip: Carefully dip each balloon into the gelatin mixture, rolling to coat evenly with a thin layer. Shake off excess gelatin. Place balloons in a heavy glass if tied to straws, or rest tie-side down on a cooling rack.
- Reheat if Needed: If gelatin thickens during dipping, reheat in the microwave for 10 seconds to maintain fluidity.
- Second Dip: After the first coat dries slightly, dip balloons again for a stronger, more vivid coating.
- Drying: Let the gelatin-coated balloons sit for 12 hours or overnight at room temperature to harden fully. To speed drying, use a small fan on low after 30 minutes, ensuring bubbles aren’t blown away.
- Remove Balloons: Gently puncture the balloon with scissors once hardened, allowing it to deflate. Carefully separate and remove the balloon from the gelatin bubble.
- Fix Indents: If the bubble collapses slightly, gently pop it back into shape as the gelatin is sturdy and flexible.
- Trim Edges: Use sharp scissors to clean up any jagged edges around the base of each bubble before using as decoration or garnish.
Notes
- Ensure the balloons are coated evenly with shortening to prevent sticking and make removal easier.
- Remove any foam on the gelatin surface before dipping to prevent cloudy or bubbly textures on the final bubbles.
- Use a fan on low speed cautiously to avoid blowing the fragile bubbles away.
- Gelatin bubbles are delicate; handle carefully after removing balloons to maintain shape.
- Luster dust is optional but can add a beautiful shimmer for more visual appeal.
- Double coating with gelatin strengthens the bubbles and enhances color vibrancy.
Keywords: gelatin bubbles, edible bubbles, dessert garnish, gelatin decorations, colorful bubbles, gelatin craft
Find it online: https://kitchenbynora.com/gelatin-bubbles-recipe/